Educator Onboarding
LEO Art Challenge Workshop
Satellite Tracking, Orbits, and Modeling
Workshop: Satellite Tracking, Orbits, and Modeling
Workshop: Trek-a-Sat
Workshop: Yerkes
Workshop: Electrostatics in Space - Carthage- Yerkes
Workshop: Life in Space! BTCI
Workshop: More Than a Rainbow - Yerkes
Workshop: Small Steps Teachimg Space Brings Giant Steps in Classrooms-SEEC
Workshop: 2017-01-28 Yerkes
Tools You Might Use
Educational Learning
Standards
Documentation
How Big is Earth? (February-April & May-June)
Aperçu des sections
-
Updated 2025
This project is made possible by awarded funding support for "How Big is Earth" from IAU-OAD under Task Force 2: Children and Schools. The International Astronomical Union (IAU) is the largest body of professional astronomers in the world and has set up the Office of Astronomy for Development (OAD) in partnership with the South African National Research Foundation.
To understand the size of Earth, it is important to understand Earth's shape of Earth which was determined over 2,000 years ago without technology! The shape was obvious to some because ships gradually seemed to move slowly across the sea and only the masts of the ships were seen at a far distance before the ship finally was lost from sight. Other observers looked at the solar and lunar exclipses and saw a dark shadow curvature passing over the sun or moon. They compared this to a rounded object (like ball or a rock made round and smooth ) casting a shadow . The curvature of the ball or rock shadow made the ancients deduce that the object making the exclipe had to round to cast a curved shadow on the sun or rmoon and people on Earth were able to view the eclipse. Shape of Earth
The oldest recorded eclipse in human history may have been on Nov. 30, 3340 B.C.E. A series of spiral-shaped and circular petroglyphs was found at the Loughcrew Megalithic Monument in County Meath, Ireland. Petroglyphs are rock carvings made by pecking into stone. Immediately in front of a carving that shows overlapping, concentric circles, archaeologists found the charred remains of nearly 50 individuals. Scholars continue to research and discuss the meaning of the petroglyphs. (https://science.nasa.gov/eclipses/history/)
The scientists 2,000 year ago, very differnt than today's scientist, made many discoveries by oberservation and deduction. Some used mathemtics such as algebra and geometry to understand the natural phenoma eclipses.
Here is a video to bring you through the ancient discovery of the shape of Earth.
Using only the sunlight striking the Earth and a wooden dowel, students can measure the circumference of the earth. Eratosthenes did it over 2,000 years ago. In Cosmos, Carl Sagan shared the process by which Eratosthenes measured the angle of the shadow cast at local noon when sunlight strikes a stick positioned perpendicular to the ground. By comparing his measurement to another made a distance away, Eratosthenes was able to calculate the circumference of the earth.
This project meets standards for Math, Science, Reading and Geography.
Students receive buttons for each activity.
-
 Teachers/Parents/Teams/Individuals: please create a topic heading that includes your school name and some information about your school.
Students: please reply under your school name and tell us some interesting facts about you. Write several complete sentences.
You may wish to include your nickname, age, favorite activities, goals and achievements. Also please let us know what you would like to see changed in the world when you are an adult.
Next:After you have written the information about you, please come back in a few days and read and reply to students in other schools by asking questions about their favorite activities, goals and achievements.
In about a week: Read the forum again and reply to any comments. :)
-
-
-

Please take this survey before viewing the project. The survey is designed to find out how many students can answer the questions correctly before participating in the project.
-
Click the link above to see the pre-project survey summary of results.
-
Click the link above to review and analyze the pre-project survey results.
-
-
-
If you cannot use Google for your Project Journal, please download the fail and use with a pencil and pen for your notebook.
-
If you cannot use Google for your Project Journal or MS Word, please download the fail and use with a pencil and pen for your notebook.
-
P
 lease keep notes of your findings and discovers in Your Project Journal.
Instructions for use:
- From the upper left hand menu, click File. A drop down menu appears.
- Select Make a copy. A small window appears.
- Enter your iCollaboratory Log In Name as the name of the new document, This page is now your Project Journal.
- Click OK and close the window.
- Click project journal. A list of document icons appears.
- Select the document with your name.
- Add your name to the document title, i.e. Bev's How Big is Earth Project Journal
You will now be able to select your project journal when you click project journal link each time it appears in an activity.
- From the upper left hand menu, click File. A drop down menu appears.
-
-
3a. YouTube: Enjoy viewing the video below. (6 minutes 41 seconds)
If you cannot view YouTube, please send iCollaboratory@gmail.com and the iCollaboratory Team will send you the video.
-
Further explanation in simpler terms.
If you cannot view the video in YouTube, please email iCollaboratory@gmail.com and the iCollaboratory Team will send you the video.
-
1. After watching video 3a, please watch the video in 3b.
2. You may wish to watch the videos again and enter some notes in your project journal.
3. Think: If you lived in the time of Eratosthenes, how would you go about figuring out the circumference of Earth?
4. With your entire class, have your teacher create a topic in the Brainstorming Assignment discussion board above for your classroom and post the steps you would use to find the circumference of earth.
-
-
Note to teachers: If you cannot use YouTube, please email iCollaboratory@northwestern.edu for another version of the video.
-
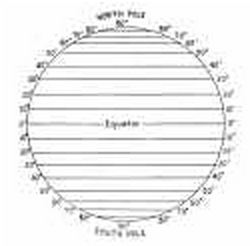 Latitude: Parallel, horizontal, invisible lines on a globe. The angular distance of a place north or south of the earth's equator, usually expressed in degrees, minutes and seconds. Latitude can be written like this: "at a latitude of 51° 19' 20' N".
 -
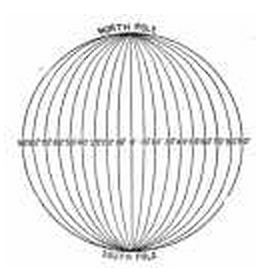
Longitude: The vertical, invisible lines on a globe. Geographic coordinate that specifies the east-west position of a point on the Earth's surface. It is an angular measurement, usually expressed in degrees, minutes and seconds.
Both latitude and longitude are based on circle and a circles always have 360 degrees.
Please enter the latitude and longitude of your school into your project journal.
-
-
If you cannot use YouTube, please email icollaboratory@gmail.com for another version of the video.
-
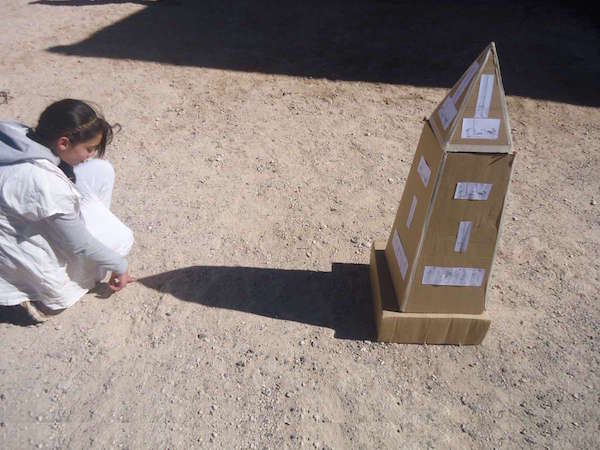
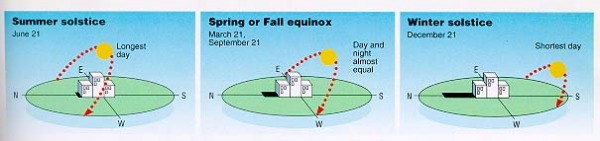 Solar noon occurs when the sun is at it's highest point in the sky and produces the shortest shadows. Solar noon does not occur at 12:00 pm each day. The time varies between 11:00 am and 1:30 pm depending on your latitude and longitude and the calendar date.
Now, you need to find your solar noon.
Tools needed: a meter stick and 2 short sticks, compass, and writing utensil
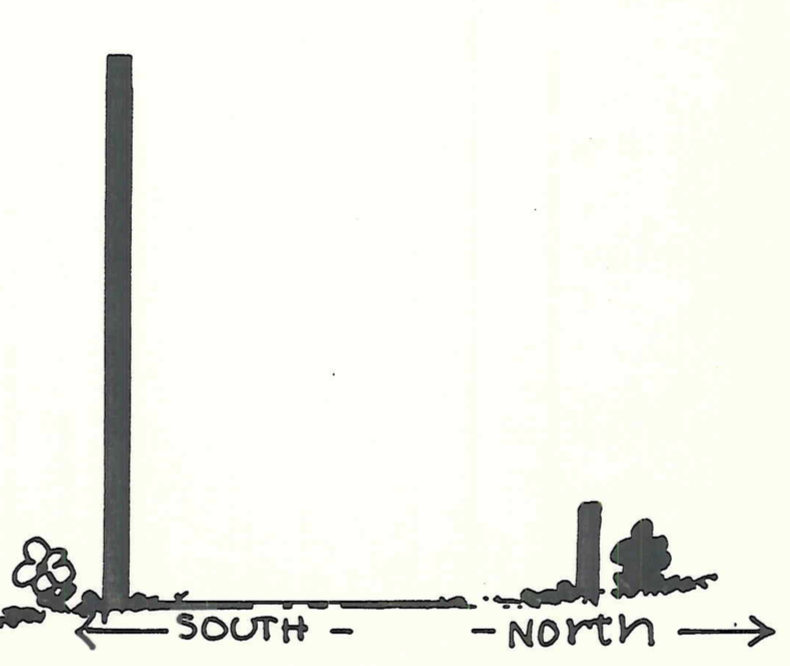
- Plant your meter stick in the ground. It must be perfectly upright.
- Use the compass to find North.
- Plant a short stick 0.5 meters North of the long stick. Plant the second short stick 0.5 meters south of the meter stick. The sticks form a sun dial. When the shadow of the Sun touches the northern short stick, the time is solar noon.
- Enter the current date and solar noon time into your project journal.
Repeat the steps above on March 19, 20. 21 or 22 and June 19, 20, 21 or 22 with all the other students and schools participating in this project.
Note to teachers:
This activity would be a precursor to Activity 6 and students just see how the angle falls without measuring the angle.This is also something that could be a long-term fixture at a school that could be viewed periodically as an extension of the project.
-
-
-
This is a Khan Academy video for practice measuring angles with a protractor.
-
You need to measure the sun's angle of inclination.
Tools needed: Apparatus from Activity 5 and 2 nails (approximately 10 cm),thin cardboard (approximately 25 x 25 cm), string(approximately 1.5 meter long), ruler.
 Obtain a meter stick.
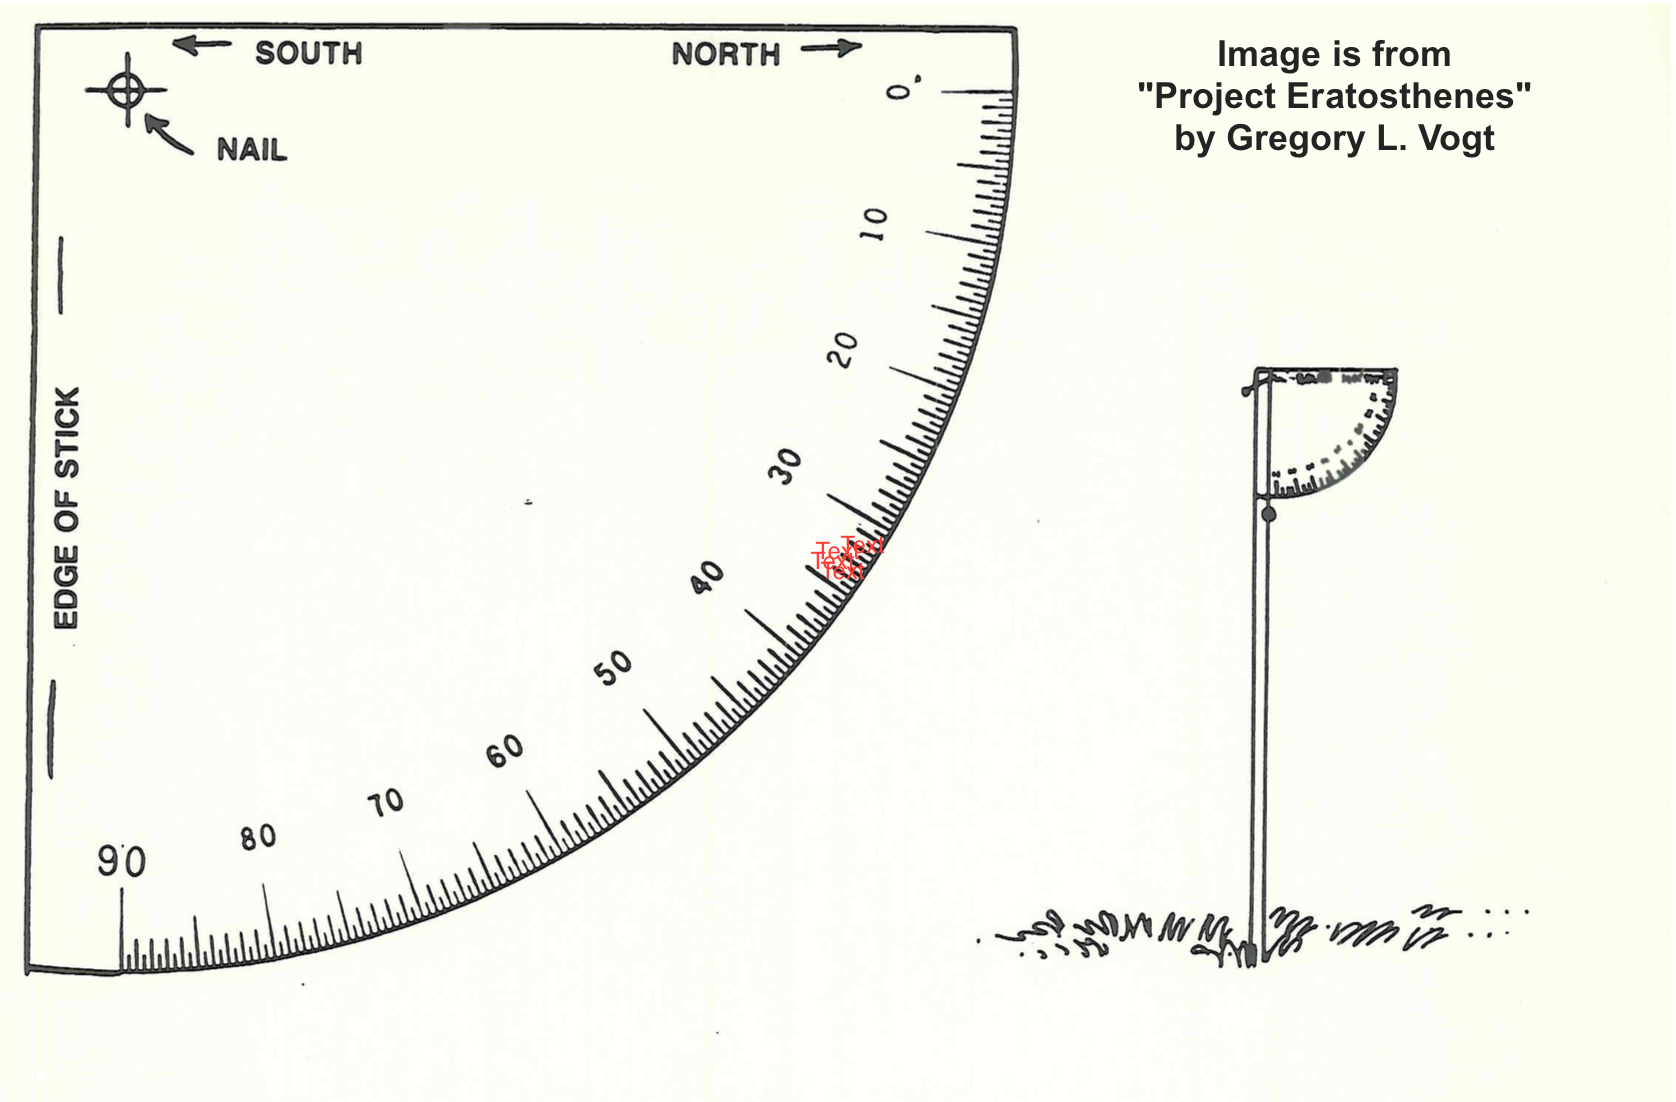
- On a piece of thin cardboard draw a quadrant (1/4 of circle) using a protractor that has lines indicating every degree from zero degrees to 90 degrees.
- Glue the quadrant to the wide side of the stick ( see drawing).
- Pound a large nail perpendicular to the quadrant at the origin (see drawing).
-
On a sunny day, at
the time of data collection, wrap one end of the string around the nail that is
at the quadrant origin point and use the other nail to anchor the other end of
the string into the ground following the sun shadow.
Note: Record the angle of the shadow on the protractor. It is the angle of the sun's inclination at the time you measured it.
Enter the time and the angle into your project journal
When you have finished, please take a digital picture of your tool and post as a reply under your school/classroom name in the forum listed above.
-
-
 Note for teachers: If you are having cloudy or inclement weather, please go to Activity 7a and 7b to find your data for this activity. You may also take digital pictures of your screen for Stellarium and the Website. You may also want to use these activities to double check your answers.
 On March 19, 20, 21, 22 and June 19, 20, 21, or 22 you need to repeat the following measurements, record them first in your project journal and next in the Survey for Data Collection linked below.
Tools needed: protractor, compass, one meter stick, nail, thin cardboard, ruler, piece of string and writing utensil.
- Obtain a 1" x 2" piece of wood that is 1 meter tall.
- On a piece of thin cardboard draw a quadrant (1/4 of circle) using a protractor that has lines indicating every degree from zero degrees to 90 degrees.
- Glue the quadrant to the wide side of the stick ( see drawing).
- Pound a large nail perpendicular to the quadrant at the origin (see drawing).
Note: the angle on the protractor will be the angle of inclination of your solar noon when you complete the official measurement.
Next:
- Plant your 1 meter stick in the ground. It must be perfectly upright.
- Use the compass to find North.
- Plant a short stick about .5 meters North of the long stick. The sticks form a sun dial. When the shadow of the Sun touches the short stick, the time is solar noon.
- Special Note: the angle on the protractor is the angle of inclination of your solar noon.
Last:
- Enter the time and angle of inclination into your project journal.
- When you have finished, please complete the Survey for Data Collection linked to the top of this activity.
- Obtain a 1" x 2" piece of wood that is 1 meter tall.
-
Or for use on a cloudy day!
Stellarium needs to be installed on your computer. You can easily download and install it from http://www.stellarium.org/en_GB/
-
If you have the free astronomy program Stellarium installed on your computers, use the directions above to complete the assignment on a shadowy day.
- Launch Stellarium on your computer and find solar noon on March 21st for your city. Note the latitude and longitude listed as well.
- Copy or create an image of the angle of the sun and the latitude and longitude.
- Enter this information in your project journal.
- Use Stellarium to find a city that has the same longitude of your city and the latitude where solar noon has a different or no shadow.
- Copy or create an image of the angle of the sun and the latitude and longitude.
- Enter this information in your project journal.
- Use Stellarium to find the distance between your city and the city with with the same longitude.
- Enter this information in your project journal.
- Enter this information in to the survey in Activity 7.
-
-
Everyone in the project should be able to use this website.
-
- Use the link above to find solar noon on March 21st for your city. Note the latitude and longitude listed as well.
- Create an image of the angle of the sun and the latitude and longitude.
- Paste this information into your project journal.
Next:
- Use a map like Google maps to find a city that has the same longitude of your city and the latitude where solar noon has no shadow (the Equator).
- Find the longitudinal distance between your city and that city.
- Create an image of the angle of the sun and the latitude and longitude of that city and your city.
- Label the distance between the two cities.
- Enter the information for #2, 3, and 4 into your project journal.
Last:
- Use a map like Google maps to find a city that has the same longitude of your city and the latitude where solar noon is a lower number.
- Find the longitudinal distance between your city and that city.
- Create an image of the angle of the sun and the latitude and longitude of that city and your city.
- Label the distance between the two cities.
- Enter the information for #2, 3, and 4 into your project journal.
- Complete the survey in Activity 7.
-
-
-
 First: Open and view the spreadsheet linked directly above.
Then: Find a school in your country are a country near you.
Next: Enter the following into your project journal.- the latitude of that school.
- the longitude of that school.
Last: Use a map to find the longitudinal distance (north-south distance) in kilometers between the two places and enter the distance into your project journal.
Now you are ready to complete the math:
1, Subtract the angle of inclination of the sun at solar noon at your location from the angle of inclination in your selected second school. This needs to be a positive number so take the absolute value of the remainder.
2. Divide this number into 360.3. Using a map, determine the distance in kilometers between you and the place you have chosen.
4. Multiply #2 x #3. The answer gives you the circumference of earth.When you do the math, what is number of kilometers for the earth's circumference?
- Enter the answer into your project journal.
- Record your information and your answer into the survey at the bottom of this activity.
Next:
- Select four more cities either north and/or south of your location.
- Complete the calculation for the four other places.
- Record the information in your project journal.
- Take the average of these five circumferences.
- Record your information in the survey survey below!
- the latitude of that school.
-
-
 Please click link above and add your reflection as a discussion topic. All project members will be able to read this information.
Please include:
Your Name
Your School
What did you find moist intriguing about doing this investigation?
What did you find difficult or unclear?
As you reflect upon how someone over 2000 years ago used a story, sticks, shadows and pacers to accurately calculate the circumference of the Earth. what do you wonder about in astronomy?
When you are a grandparent, what would you tell your grand child about your participation in this project?
-
-
-

Please complete the survey by clicking on the link above so you can see your improvement in knowledge of scientific terms
.
-
-
After completing the final survey below, you will receive a Certificate of Completion.
Send a Postcard to Space through NSS Supported Blue Origin Club For The Future initiative!
Visit: SpacEdge Academy Postcards in Space Course

 .
.